Archive for the ‘Linux’ category

Re-Map Default Mouse Buttons in Ubuntu Karmic

November 9th, 2009

While setting up a new installation of Ubuntu 9.10 for a friend, I ran into a small issue: she was using a 4 button Kensington trackball mouse, and the default key mappings made little sense.  Naturally, there were no drivers or software available, but after some research I was able to figure out how to manually remap the mouse buttons.

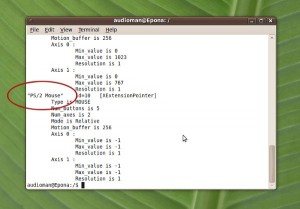
Step 1. Find the name of your device.
This step is pretty simple.  Open up a terminal and type in the command:

xinput list

This will list all of the input devices recognized by the X window system.  The names are in quotes, and should be pretty self-explanatory; any external mice should be near the bottom.

xinput list

Step 2. Find your button numbers
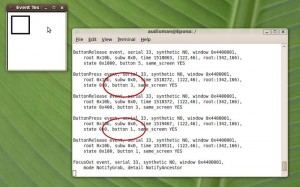
Each mouse button has a unique number to the system, and your next job is to find out what they are.  In your termal window type:

xev

This will open a new smaller window.  Whenever your mouse is over the new window, the terminal will print any input it receives.  This includes both movement and button presses.  For each button on the mouse, press it, and write down what button number it displays.  Don’t forget that scroll up, down, left, and right and wheel click are all treated as different “buttons”.

xev

Step 3. Re-Map the buttons
You can modify your your mappings with the following command (substituting your device name from step 1)

xinput set-button-map "Device Name" 1 2 3 4 5

Running the above command will most likely change nothing, it will map all the buttons to their default functions.  Let’s say your left and right click map to 1 & 3 respectively.  If you wanted to switch them (perhaps for a left-handed user) the command would be:

xinput set-button-map "Device Name" 3 2 1 4 5

In the case of my friend (with a Kensington pro mouse) we needed to swap the 1 & 3 with the 8 & 9 buttons.  That looked like this:

xinput set-button-map "Kensington Pro PS/2" 8 2 9 4 5 6 7 1 3

Note that you can enter as many numbers as you like, up to the number of mouse buttons.  Any numbers you don’t enter will be assumed to be the sequential default.  Thus the following command is equivalent to the one above:

xinput set-button-map "Kensington Pro PS/2" 8 2 9 4 5 6 7 1 3 10 11 12 13

Step 4. Saving your mappings
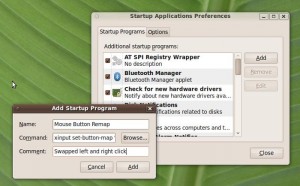
Once you’ve found the correct sequence of numbers, you can have it load automatically by creating a startup item.  Navigate to the following menu:

System > Preferences > Startup Applications > Add

and enter the following:

Name: Mouse Button Remap
Command: xinput “Device Name” 1 2 3 4 5
Comment: “Swapped the left and right click”

Add Startup

Ta Da! You’re Done!

Ubuntu Server Setup Checklist

June 20th, 2009

I’ve now set up half a dozen or so Ubuntu Server installations over the past year or two.  For the last few, I created a checklist to make sure I don’t leave any of the smaller, less obvious things out.  I present it here, completely unmodified.  Note, this is more of a preliminary checklist, as it doesn’t include installation of Apache, MySql, PHP or any other programs such as Postfix.  Basically, I’ll perform these steps regardless of whether It’ll be a web or mail server.  These also assume you like the vi text editor, if not, you can substitute emacs, nano, or whatever your preference when neccesary.  Also, some of these are already done depending on your server host.

Time/Date/Language
Fix Locale Warnings:
# apt-get install language-pack-en

Set Timezone:
# dpkg-reconfigure tzdata

Install Time Daemon:
# apt-get install ntp

General
Install Manual Pages:
# apt-get install man

Add Domain name
# vi /etc/hosts
127.0.0.1 localhost
123.456.789.012 computername.domain.com computername (replace external ip)

Security
Add Administrative User (with home directory):
# useradd myusername -m

Give Admin user Sudo Powers
# visudo
myusername ALL=(ALL) ALL

Set Admin Password
# passwd myusername

Set Admin Shell Preference (optional)
# vi /etc/passwd
myusername: […] :bash

Disable Root SSH Login:
# vi /etc/ssh/sshd_config
PermitRootLogin no <–MAKE SURE YOU CREATED ADMIN & PASSWORD

Tighten default permissions for file & directory creation:
# vi /etc/profile
umask 027 (no default access for others)

Install and Set Up Firewall
# apt-get install ufw
# ufw allow ssh <–DO NOT FORGET THIS
# ufw enable

Rackspace Cloud Hosting – Unexpected Awesomeness

June 10th, 2009

Rands, an internet celebrity among the tech crowd, once wrote that for him to use a a new application, it must:

  1. look and feel like magic.
  2. Work flawlessly in the first 10 minutes.
  3. Provide additional, unexpected awesomeness.

Ever since reading that, I’ve placed most new things I encounter up to that test.  Suprsingly few hold up.  Last week however, one passed with flying colors.  I was shopping for a cost-effective way to consolidate my web hosting plans.  I was specifically looking for a virtual private server with strong uptime and speed numbers, Ubuntu Server OS, and a low price. Rackspace cloud servers fit the bill perfectly, so I signed up.  So how did it score? Let’s see:

Magic:  You start off by picking your server size.  It’s easier than shopping on Amazon.  256mb of RAM. Done.  Then you pick your OS.  Not only did they have Ubuntu, they had the latest three releases.  Next up, you see your virtual server created in real time with a nice little progress bar.  Create an entirely new server in 30 seconds?  Watch the whole process without a page load?  Good enough to be magic for me.

Work Flawlessly:  I spent the next 45 minutes going crazy with apt-get and wget.  I installed Apache, Mysql, PHP, Postfix, Dovecot, GD, WordPress & Roundcube.  Not a single hitch.

Unexpected Awesomeness:  Backups!  Daily, weekly and variable backups are included.  You can image the entire server without taking it offline, and restore a backup with one-click.  Scaling!  I decided to bump my plan from 256 to 512mb of RAM.  The entire process took about two minutes, and there was no need to re-configure anything.  DNS Hosting!  You can stack domain nameserver hosting on for free even if the domains are registered elsewhere.  Reverse DNS Lookup!  I’ve never found another host or ISP that makes it as easy to set your PTR record.  Support Chat!  I don’t feel like waiting on hold for support.  Twice I opened an IM window and got help from a human within a minute.  Basically there was enough unexpected awesomeness to go around.

Cloud Hosting and Cloud Computing by Rackspace - Formerly Mosso

Hats off to Rackspace, my new favorite hosting company!

The Sticky Bit

January 20th, 2009

Just about any linux user is familiar with the unix permission system. You have three categories of users (user, group, other) and three different permission options (read, write execute). However, most users don’t know about several advanced permissions, one of which is the sticky bit.

Besides having a cool name, the sticky bit provides a very useful function: when set as a directory permission it lets anyone add things the the directory (write access), but they can only delete things they own. Normally, allowing all users write access also allows all users to delete anything (yeah, that’s dangerous).

In particular, users can only remove files if at least one of the following is true:
-The user is the owner of the file
-The user is the owner of the parent directory
-The user has write permissions on the file

When is this useful? It’s commonly found in var directories, when everyone needs to be able to create files, but shouldn’t modify files for other users. It’s also common in mailbox directories for the same reason. I found it particularly useful for a media folder that is shared between users. Users can add Pictures and Videos to the folder, but can’t delete those belonging to others.

So how do you set it?
-For chmod in relative mode, the sticky bit is designated by a “t”

# chmod t filename

-For chmod in absolute mode, the sticky bit can be added by prepending a “1” the the permission.

#chmod 1777 dirname

Cool huh?

Turning off the Terminal Beep

December 5th, 2008

I use the VIM editor.  Alot.  That means that I get beeped at.  Alot.  As a note to those who haven’t used VIM, it beeps through the system speaker, not your normal speakers.  The system beeper is an especially annoying relic, leftover from two decades ago when a system beep was actually useful. I’d finally had enough, so I figured out how to turn it off.  It turns out that (like everything else) it’s extremely easy in Ubuntu.

System -> Preferences -> Sound -> System Beep -> Enable System Beep

I unchecked that puppy, and now my computer my computer doesn’t make a sound (except of course, the hum of 8 fans pushing 1,000cfm of air across my OC’d mobo).

Mac OS X vs Gnome (Ubuntu) Spaces

November 29th, 2008

Apple introduced a fabulous feature in OSX 10.5 called spaces. It basically gives you 4 monitors (actually between 2 and 8), so you can have more windows open, and switch between them as necessary. Linux has been doing this for a decade, and I’m happy to finally see OS X pick the feature up. This is preferable to minimizing windows for several reasons. First, you don’t have to waste time trying to figure out which minimized window (which all look the same at 50 pixels) is the one you want. I know Firefox is open is space 2 (or upper-right), and I can quickly move there with the same keystroke every time. Second, you don’t need to leave the keyboard to switch views. I can be coding in Dreamweaver, shift to view some example code in Firefox, and switch back to Dreamweaver and continue typing away, no time lost. Basically spaces = productivity.

I see three problems with the implementation of spaces in 10.5. First, each space has a default application that comes in focus when you switch to that space. If I open up Filemaker in space 1, then open Dreamweaver, Filemaker will be the default application, and will always be in focus when switching between spaces. Not very effective if I’m currently coding in Dreamweaver. Second, opening a new window of an already open application will always send you back to the original space. For example, if now I try to open a Filemaker database in space 3, it will automatically shift me back to space 1. Most annoying. Third, you can set up 4 workspaces as either a row (1×4), or a square (2×2). This is great, except that the keyboard shortcuts don’t recognize the difference. If I’m in the upper-right space in a square setup, and press the “move right” key, it sends me down to the lower left space. For those of us visual people, this is an obvious problem.

Fortunately, OSX 10.5.2 gives you a setting to disable the automatic space-shifting in the control panel. I was happy to see this in the update. Now, if I want to open Firefox in two different spaces, I can do that. Apple needs to work on the other two issues though. If anyone knows ways to change this behavior, please let me know.

Ubuntu (more accurately, the Gnome desktop), Implements this feature with a bit more success. First, it doesn’t suffer from three problems mentioned earlier. I can open windows in any space. It will remember what window I was using, and bring me back when I switch, and pressing “up” and “right” will always bring me to the upper right space, regardless of where I’m working. There’s a couple other touches I like as well. It moves faster; if I press keys in quick succession, it will always catch them, whereas with OSX it will often miss one (such as the upper-right example). Ubuntu also shows your panels moving with the space, which makes more sense visually to me.

Basically, I’m happy to Apple finally use this feature, but it needs a little polishing before I’ll prefer it over Gnome’s more intuitive (and more established) version.

Setting MP3 Bitrate in Rhythmbox

November 28th, 2008

Rhythmbox is the music player that comes on the default Ubuntu installation. Anyone that has ever used iTunes, Windows Media Player or any other similar program will find it very intuitive. You do need to download an extension to add MP3 capability, but this is easy to do.

What frustrated me for months has been the lack of options for ripping music from CDs. Although it has a great selection of formats (WAV, flac, ogg, mp3) it doesn’t give you any options for setting the mp3 bitrate. At last I found a way, and thought I would pass it on:

Open “Preferences” from the “Edit” menu
Select the “Edit” button to the right of “Preferred Format”
Select “CD Quality, MP3” from the menu and hit “Edit”
Under the “Gstreamer pipeline” field you will find the following:

audio/x-raw-int,rate=44100,channels=2 ! lame name=enc mode=0 vbr-quality=6 ! id3v2mux

To remove the default, remove the vbr-quality=6 statement, and replace it with vbr=0 bitrate=256. This will change it from variable to constant bit rate, and set it to 256 kb/s. You can set it to whatever bit rate you prefer, I like 256. You line should now look like the following:

audio/x-raw-int,rate=44100,channels=2 ! lame name=enc mode=0 vbr=0 bitrate=256 ! id3v2mux

Close the window, and Viola! You’ll now rip CDs at a higher quality