Buddypress Group Invite by Email

March 17th, 2010 by Peter Anselmo 3 comments »

Here’s another small plugin I wrote: Group Invite By Email.  Basically, it adds an email field to the bottom of the usual “send-invites” screen.  Then, when you click “send invites” it sends the person a nice little email explaining they’ve been invited to your group, and giving them a link to register on your site.

Once they complete the registration, it automatically adds them to the group.  It does this by checking their email address against a list of outstanding invites.  This removes the extra hassle of needing to invite them to the group after you’ve gotten them to sign up, and them needing to approve your group invitation.

In the future, this functionality will likely be bundled with another plugin already existing: Invite Anyone. That plugin allows you to invite non-friends to your group; this one allows you to invite non-members.

Here it is:
buddypress-group-invite-email (.zip)

Buddypress Default Forum Topic

March 14th, 2010 by Peter Anselmo No comments »

This plugin I wrote that creates a default topic for each group forum in BuddyPress.  Please note, you have to open up the PHP file, and replace the values for the default title and text with what you would like to use.  Even if you are unfamiliar with PHP, this should be very straightforward.

To Install:
-Extract and upload the files to your wp-content/plugins/ folder.
-Go to the “Plugins” screen on the admin dashboard, and activate the plugin
-Enjoy.

Here it is:
default-forum-topic (.zip)

Buddypress Group Document Store

December 24th, 2009 by Peter Anselmo 1 comment »

I just uploaded my largest wordpress plugin yet: Buddypress Group Documents!

Group Documents creates a page within each BuddyPress group to upload and store documents.  Documents can be edited and deleted either by the owner or by the group administrator.  Document activity is logged in the main activity stream, and is also tied to the user and group activity streams.  The site administrator can set filters on file extensions, and soon (in the next update) users can set email notification preferences.  There is also a “Recent Uploads” widget than can be used to show any number of uploaded documents.

Get it while it’s hot!
WordPress.org Plugin Download Page

Installation
Make sure WPMU and BuddyPress are installed and active.
Copy the plugin folder buddypress-group-documents/ into /wp-content/plugins/

Browse to the plugin administration screen and activate the plugin.

There will now be a “Group Documents” menu item under the “BuddyPress” menu.  Here you will find a list of all file extensions allowed for uploaded files.  Please check and make sure the list suits you.

Please don’t hesitate to contact me, especially if you run into trouble.  I will respond promptly.  email hidden; JavaScript is required

Buddypress jQuery is not defined error

December 16th, 2009 by Peter Anselmo 4 comments »

While developing a Buddypress plugin, I was running into a problem where none of my Javascript was working. Instead, Firebug was telling me: “jQuery is not defined”.  This was quite frustrating, as I could verify that the jQuery file was indeed, being loaded.  While a few other people received the same error for different reasons (corrupt files, etc.) I did not quickly find the solution for my problem.  Here it is:

Problem: Buddypress calls your plugin’s JS files BEFORE jQuery files.
This applies when you use the function wp_enqueue_script() – as you should.

Solution: Tell wp_enqueue_script your file depends on jQuery.
It turns out, wp_enqueue_script() takes a few optional parameters – the third being an array of other js files yours is dependent on.

Here’s how the call looks after the change:
wp_enqueue_script(‘my-js-file’,’my-file-path.js’,array(‘jquery’));

Viola!  Your js file is now loaded after jQuery and you’re good to go.

Syncing Filezilla Sites across Computers with Dropbox

November 22nd, 2009 by Peter Anselmo 29 comments »

I often find myself editing websites on several different computers.  One of the more tedious things is keeping all my FTP settings updated across them.  I’d start development on a new site at work, then try to continue from home, only to find I’d forgotten to write down the connection credentials.  Alternately, even if I did have them on hand, entering them for each FTP client is a waste of time.  Dropbox to the rescue!  Here’s how:

1. Find your site manager file
Filezilla keeps all of your sites and access credentials in an XML file called “sitemanager.xml” Here are the most likely locations:
Windows 7 & Vista – C:\Users\Yourname\AppData\Roaming\FileZilla\sitemanager.xml
Mac OS X – /users/Yourname/.filezilla/sitemanager.xml
Linux – /home/Yourname/.filezilla/sitemanager.xml

2. Back it up
Just in case something goes wrong in the next few steps.  Copy the file and name it something else, perhaps “sitemanager.xml.backup”

3. Move sitemanager.xml to Dropbox
I keep a folder in dropbox called “Settings” which I use for program files that I sync.  Place it where it makes sense to you, just remember that location for the next step.  Note, you want to move the file, not copy it.  It cannot still exist in the filezilla folder, or the next step may not work.

4. Make a soft link from Dropbox back to your Filezilla folder
Filezilla will still look in it’s default place for the sitemanger file.  You’re going to trick it and point it to the file you have snyc’d on Dropbox.  You’ll need to open up a Command Prompt (Windows) or a terminal (OS X/Linux) for this step.  This is what the commands looked like for me, you’ll need to adjust the file paths as necessary.  Note, on Windows, you enter the new link first, then the existing target, and on OS X & Linux, it is the opposite order.

Windows:
mklink “C:\Users\peter\AppData\Roaming\FileZilla\sitemanager.xml” “C:\Users\peter\My Dropbox\Settings\sitemanager.xml”

OS X:
ln -s /users/peter/Dropbox/Settings/sitemanager.xml /users/peter/.filezilla/sitemanager.xml

Linux:
ln -s /home/peter/Dropbox/Settings/sitemanager.xml /home/peter/.filezilla/sitemanager.xml

That’s it!  Fire up Filezilla, and you should see the same site settings now on all of your computers.  Note, if you use “Synchronized Browsing”, you’ll need to create separate bookmarks under each site for each computer, as the local path to your files will be different depending on your computer.

Using Custom Profile Field Data in Buddypress Templates

November 18th, 2009 by Peter Anselmo 3 comments »

I ran into what I thought would be fairly common need for Buddypress theme development, the ability to pull data from a custom user profile field and display it. After searching a bit, I could only find way to pull either random fields, or all of the fields together. So after digging around in the core files, I found the pieces to put together my own function for the task.

1. Create the file “bp-custom.php” and place it directly in the plugins folder. Note, do not place it in the “buddypress” folder, otherwise it will be overwritten when upgrading. If the file exists, simply append to it rather than creating a new one.

2. Paste the following function in:

function bp_the_site_member_profile_data($field_name = '', $echo = 1) {
  if( !$field_name ) {
    return false;
  }
  global $site_members_template;
  if( function_exists( 'xprofile_get_field_data' ) ) {
    $data = xprofile_get_field_data( $field_name,
                                     $site_members_template->member->id);
    if( $echo ) {
      echo "$data";
      return true;
    } else {
      return $data;
    }
  }
}

3. You can now use the function ‘bp_the_site_member_profile_data(‘MyField’) in your templates (of course, substituting ‘MyField’ with the one you’d like to use). Note, this must be place inside a ‘Members Loop’ so that the $site_members_template variable is populated.  Odds are, you’re inserting this near other profile data already in the loop, so there should be no problems.

UPDATE:
As of BuddyPress 1.2, this functionality has been included. While in the members loop, you can use the included function: ‘bp_member_profile_data( ‘field=the field name’ )’ to much the same effect.

Re-Map Default Mouse Buttons in Ubuntu Karmic

November 9th, 2009 by Peter Anselmo 5 comments »

While setting up a new installation of Ubuntu 9.10 for a friend, I ran into a small issue: she was using a 4 button Kensington trackball mouse, and the default key mappings made little sense.  Naturally, there were no drivers or software available, but after some research I was able to figure out how to manually remap the mouse buttons.

Step 1. Find the name of your device.
This step is pretty simple.  Open up a terminal and type in the command:

xinput list

This will list all of the input devices recognized by the X window system.  The names are in quotes, and should be pretty self-explanatory; any external mice should be near the bottom.
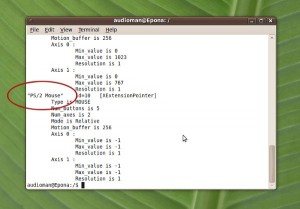
xinput list

Step 2. Find your button numbers
Each mouse button has a unique number to the system, and your next job is to find out what they are.  In your termal window type:

xev

This will open a new smaller window.  Whenever your mouse is over the new window, the terminal will print any input it receives.  This includes both movement and button presses.  For each button on the mouse, press it, and write down what button number it displays.  Don’t forget that scroll up, down, left, and right and wheel click are all treated as different “buttons”.
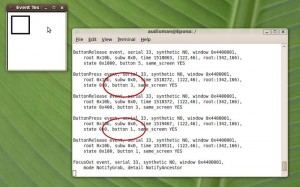
xev

Step 3. Re-Map the buttons
You can modify your your mappings with the following command (substituting your device name from step 1)

xinput set-button-map "Device Name" 1 2 3 4 5

Running the above command will most likely change nothing, it will map all the buttons to their default functions.  Let’s say your left and right click map to 1 & 3 respectively.  If you wanted to switch them (perhaps for a left-handed user) the command would be:

xinput set-button-map "Device Name" 3 2 1 4 5

In the case of my friend (with a Kensington pro mouse) we needed to swap the 1 & 3 with the 8 & 9 buttons.  That looked like this:

xinput set-button-map "Kensington Pro PS/2" 8 2 9 4 5 6 7 1 3

Note that you can enter as many numbers as you like, up to the number of mouse buttons.  Any numbers you don’t enter will be assumed to be the sequential default.  Thus the following command is equivalent to the one above:

xinput set-button-map "Kensington Pro PS/2" 8 2 9 4 5 6 7 1 3 10 11 12 13

Step 4. Saving your mappings
Once you’ve found the correct sequence of numbers, you can have it load automatically by creating a startup item.  Navigate to the following menu:

System > Preferences > Startup Applications > Add

and enter the following:

Name: Mouse Button Remap
Command: xinput “Device Name” 1 2 3 4 5
Comment: “Swapped the left and right click”
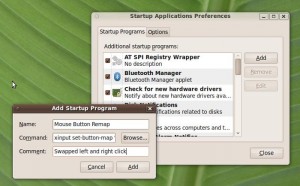
Add Startup

Ta Da! You’re Done!

Ubuntu Server Setup Checklist

June 20th, 2009 by Peter Anselmo No comments »

I’ve now set up half a dozen or so Ubuntu Server installations over the past year or two.  For the last few, I created a checklist to make sure I don’t leave any of the smaller, less obvious things out.  I present it here, completely unmodified.  Note, this is more of a preliminary checklist, as it doesn’t include installation of Apache, MySql, PHP or any other programs such as Postfix.  Basically, I’ll perform these steps regardless of whether It’ll be a web or mail server.  These also assume you like the vi text editor, if not, you can substitute emacs, nano, or whatever your preference when neccesary.  Also, some of these are already done depending on your server host.

Time/Date/Language
Fix Locale Warnings:
# apt-get install language-pack-en

Set Timezone:
# dpkg-reconfigure tzdata

Install Time Daemon:
# apt-get install ntp

General
Install Manual Pages:
# apt-get install man

Add Domain name
# vi /etc/hosts
127.0.0.1 localhost
123.456.789.012 computername.domain.com computername (replace external ip)

Security
Add Administrative User (with home directory):
# useradd myusername -m

Give Admin user Sudo Powers
# visudo
myusername ALL=(ALL) ALL

Set Admin Password
# passwd myusername

Set Admin Shell Preference (optional)
# vi /etc/passwd
myusername: […] :bash

Disable Root SSH Login:
# vi /etc/ssh/sshd_config
PermitRootLogin no <–MAKE SURE YOU CREATED ADMIN & PASSWORD

Tighten default permissions for file & directory creation:
# vi /etc/profile
umask 027 (no default access for others)

Install and Set Up Firewall
# apt-get install ufw
# ufw allow ssh <–DO NOT FORGET THIS
# ufw enable

Rackspace Cloud Hosting – Unexpected Awesomeness

June 10th, 2009 by Peter Anselmo No comments »

Rands, an internet celebrity among the tech crowd, once wrote that for him to use a a new application, it must:

  1. look and feel like magic.
  2. Work flawlessly in the first 10 minutes.
  3. Provide additional, unexpected awesomeness.

Ever since reading that, I’ve placed most new things I encounter up to that test.  Suprsingly few hold up.  Last week however, one passed with flying colors.  I was shopping for a cost-effective way to consolidate my web hosting plans.  I was specifically looking for a virtual private server with strong uptime and speed numbers, Ubuntu Server OS, and a low price. Rackspace cloud servers fit the bill perfectly, so I signed up.  So how did it score? Let’s see:

Magic:  You start off by picking your server size.  It’s easier than shopping on Amazon.  256mb of RAM. Done.  Then you pick your OS.  Not only did they have Ubuntu, they had the latest three releases.  Next up, you see your virtual server created in real time with a nice little progress bar.  Create an entirely new server in 30 seconds?  Watch the whole process without a page load?  Good enough to be magic for me.

Work Flawlessly:  I spent the next 45 minutes going crazy with apt-get and wget.  I installed Apache, Mysql, PHP, Postfix, Dovecot, GD, WordPress & Roundcube.  Not a single hitch.

Unexpected Awesomeness:  Backups!  Daily, weekly and variable backups are included.  You can image the entire server without taking it offline, and restore a backup with one-click.  Scaling!  I decided to bump my plan from 256 to 512mb of RAM.  The entire process took about two minutes, and there was no need to re-configure anything.  DNS Hosting!  You can stack domain nameserver hosting on for free even if the domains are registered elsewhere.  Reverse DNS Lookup!  I’ve never found another host or ISP that makes it as easy to set your PTR record.  Support Chat!  I don’t feel like waiting on hold for support.  Twice I opened an IM window and got help from a human within a minute.  Basically there was enough unexpected awesomeness to go around.

Cloud Hosting and Cloud Computing by Rackspace - Formerly Mosso

Hats off to Rackspace, my new favorite hosting company!